Thursday, April 9, 2015

Christmas in April: A Christmas Decorations post four months late!


This year I am really trying to be more creative, and document that creativity with this blog. Hopefully it will inspire me further, and inspire others along the way! 

Well, I did some small Christmas crafts last year that I wanted to share, and since I am just recently committing to updating this blog more, I am just now posting about Christmas! Good thing Santa wasn't this late... the kids would have been heartbroken!

As I said in my last post, this was our first Christmas in our new home. I knew I wanted some fresh decor this year, but couldn't spend too much. I ended up making some inexpensive paper garland for around the house, making pine cone ornaments, and painting some artwork for our mantle myself. I also chose to do a different kind of tree skirt.


First I made the paper garland (can you see it up there in the window?? Sorry there is not a closer picture!). I bought one of those big pads of paper in Christmas theme from Michael's, on sale of course. What I love about those is all of the designs coordinate and are made to go together perfectly! I cut the sheets into squares with a paper cutter, then cut out the wedge at the bottom with scissors. It is hard work, but so cute! Then I punched hoes in the top corners and ran regular old yarn through to string it up. I had extra yarn from something else, so all it really cost me was the $10 for paper, time, and hand strength. It doesn't look like much in the picture, but it added a nice punch of color and cheer to our house... we do still have white walls after all, and need all the color punch we can get!


Another of my projects this year was to make my own christmas art for our mantle. I looked at buying some fun prints, but decided I'd rather spend that money on presents for the boys instead. So I had some canvases and paint already on hand, and went to work! I made a pretty evergreen, a pine cone (my obsession this year!), and a "may your days be merry and bright" sign. I liked it. I also took some extra pine cones from my last project (see the wreath post below) and tied yarn to them to make pine cone garland and ornaments. It was very simple, and prickly.


While I was in my art space painting, miss Birdie Bird Dog kept giving me the "Really? Let's go inside" look. Even though she was impatient with me, she's the best painting companion!


 For our "tree skirt" we did a train-scape! It was so fun and whimsical, and I was so glad that we just happened to think of it while playing trains with the boys one day! I kept thinking "now how am I going to do a tree skirt without spending too much, and clashing with the rug", and so on and so on. Then one day we just didn't pick up the boys' trains and I put them together under the tree and it was so cute! We may do it every year because it was adorable and they got to play there. We did start to get presents wrapped and ended up putting them in the fireplace (we haven't used it), but eventually we had too many and the train had to go. But in the beginning before we had presents, it was a cute way to make that space not seem so bare!


See the presents in the Fireplace??


Christmas Wreaths on the Cheap


This year was our first Christmas in our new home... our first single family home to ever live in, let alone own! Since being married for 7 years, my husband and I, and eventually our two sons, have moved 5 times. We live within the city, and of course city living is a bit more expensive than the suburbs, even without getting extra space. On top of that we live on a modest income. We are not in need, but not in excess either. So buying a home was never really on the radar... it was more of a pipe dream for sure! Especially since we wanted to live in the city, and know that it costs more. So we've rented for the last 7 years. And with renting there is always something you don't like about the space (or lack of space). Thus, we moved almost every year. This was also a result of adding members to our family.

Last year we were blessed enough to be able to buy my husband's Aunt's home, located in an up and coming (and old and charming!) neighborhood just miles from downtown. The home was also my husband's grandparent's home before they passed away, and the house his mother lived in for the latter part of her childhood. It really is special that we now get to raise our boys here, with so much family history all around. One day I will post all about the house, and the renovations and transformation it went through. I really have to get my photos together for that post!

But anyways... today I will post about our first Christmas in our house. As I was saying, we never lived in a single family home, so I didn't have any decorations for outside! I knew what I wanted to do to decorate, but quickly realized that I could easily spend a fortune on beautiful wreaths and pre-lit garland! I set out to find a way to get what I wanted for cheap.


I found these plain wreaths at Wal Mart for $3 each. I got three of them for three of our front windows, and one larger $4 wreath for our door. They are the wiry kind where you can fluff up the sprigs and adjust how you want.


A trip to a local park allowed me to pick up all the pine cones I desired for my project, and I saved about $10... store bought pine cones... so silly.


I bought Epsom Salt in "mint eucalyptus", I think, for the fake snow and sparkle on my pine cones. It smelled really good while coming in the door all season. All I had to do was put some mod podge (or any liquid glue) on the pine cones, roll the cones in the salt, and let dry before hot gluing onto the wreath. I already had the glue, and the salt was about $4, but I was able to do all the wreaths, and have some left for baths.


Here is the finished wreath, before I made bows and hung them. I really apologize for my very busy, very tacky table cloth! I am going to start taking better pictures now that I know I'll be posting more of my projects!


I also took some cheap plain garland and bought lights for them, and made my own "pre-lit" garland for a fraction of the cost (not pictured). The garland had the same wiry sprigs so I used those to secure the lights, and packed them up all still together, as if they were always meant to be together. 

Thursday, April 2, 2015

Throwback Thursday: Thanksgiving

In catching up on blog posts that I meant to post, but never did, I wanted to post about our Thanksgiving last year. This was my first ever attempt at hosting Thanksgiving dinner for our family. We wanted to stay home this year, as it is our first year in our first owned home. Since we live on a modest budget, we wanted to keep it small and only invited our parents to join us. We are so glad they were able to, as we wanted to spend this day giving them a great meal as Thanks for all of the ways they have supported our family over the years!

Thanks to The Pioneer Woman for her Holidays Cookbook. This book was my guide in hosting this first Thanksgiving! I definitely made way too much (and I didn't even do everything in her plan!), but it was all good and timed out perfectly thanks to her help.


I love Fall, and really wanted a very Leafy fall decoration... and that is what we had. No lack of leaves here! Now that I see it so many months later, it is a little tacky, but it was perfect in the moment, haha!


We used plain brown paper as a table runner, and a wood crate my hubby made, pecans from the back yard, and a few small pumpkins for our centerpiece. It was cute, but definitely simplified and on the cheap. BigBro, who was just learning to read and write at this time, wrote everyone's names in their spot.


The best part about having a small family get together, is everyone fits in one room! Here we are in our TV room watching the Macy's Thanksgiving Day Parade because I missed it while cooking, and watching it is a must for me every year!


Belated Halloween Glove Monsters!

Last Halloween season BigBro and I made glove monsters! It was so fun, and this was his first experience with sewing. I bought some cheap gloves at Michael's in fun colors. First, I sewed the thumb shut by turning the gloves inside out and sewing along the thumb opening, and part of the wrist opening, leaving enough space to stuff the monsters. BigBro stuffed the gloves and sewed up the little opening. I helped him close them up real tight after he did a few stitches. I gave him a pretty chunky plastic needle, and he used embroidery floss to sew the gloves up, so it was safe enough for a 4 year old.


We then hot glued all the eyes (buttons) and mouths (cut felt) and other decorations on the monsters. He told me what he wanted and where, and I did all of the gluing. I might have burned my fingers while gluing some of the small pieces, but I think my reactions to that were a good deterrent for BigBro ever touching got glue!


These turned out super cute. We still have them, with the exception of one or two that Birdie Bird Dog thought were pretty tasty!

The idea for this craft originated HERE

Belated Halloween Post: Cheap DIY Batman and Robin costumes!

Last year my oldest wanted to be Batman for Halloween. I like to go with themes, so we had little brother be Robin. Our themes may not go as well next year when LilBro can actually speak for himself!

Growing up my mom always made my Halloween costumes. It was probably more out of necessity and lack of funds, but mom is also creative and likes to make things herself. The costumes were not grand sewing projects or anything (mom doesn't sew!), but as a little girl I thought they were the best and most unique costumes, unlike anyone else's from the store, and I still love that she did that for me!

This has translated into my adulthood in that I now make all of our family's costumes, and refuse to spend the money on the cheap (quality) store bought ones. Now, these aren't fancy, by any means! Anyone can do it, even if you can't sew! They are fun, inexpensive, and pieced together with a little imagination, but the boys love it and use the costumes year around! I love seeing their faces light up when the costume is finished and ready to wear.

I know that someday they may insist on the store bought costume, because all of their friends get to buy theirs. And I will probably give in at that point. But for now I will relish being able to make their Halloween dreams come true while they make believe to be someone else for a night, in something I created for them :)

Back to Batman and Robin... For Batman, I found a gray sweatshirt and sweatpants at the thrift store ($1.50 each), added blue felt cuffs, and "boots" at the bottom. Then I cut out a Batman emblem and utility belt with yellow and black felt, and sewed it all on. I just kinda cut and sewed as I went, because that's kind of how I work, but if you want a plan then you can lay it all out and pin it together then sew it all at once. Then I just sewed a blue felt cape on the back and it was done! I did sew, but you could also iron all of this on if you prefer. I knew they would wear it after to play in, so I wanted to make it where it won't come apart as easily. The felt was probably about $5 on sale at JoAnn's Fabrics. I never buy fabric for full price, because they always have sales! I found the Batman mask on Amazon, for like $10. It was my splurge, because I wanted BigBro to have a great mask!


For Robin, I found green pants and a black shirt, again at the thrift store, for about the same price as Batman's suit. I added a red felt "sweater vest" shape to the front of the shirt (not the back). Then I made the same kind of utility belt and emblem and buttons as with Batman, with yellow and black. and added black "boots" to the bottom, and a black cape on the back. Robin had more colors, so I had to buy red and more black for felt for his outfit. It was probably still around $5 for his felt, too. Bet you never knew Robin needs a paci and Giraffe blankie with him to fight crime!


Batman is doing a little dance here... ready for some candy! 


Batman and Robin on the porch... I will cherish this picture and moment always :)

Thursday, April 3, 2014

Yo Gabba Gabba Cupcake Topper Printables

Last year we did a Yo Gabba Gabba party for my oldest son's 3rd birthday. I probably won't always have free printables to offer, except during birthday season when my husband does all my creative print bidding, haha!


 I wanted to do a short post to share his files from that party, since they were super cute :) One thing I learned during this party was to not put the toppers on the cupcakes the night before. They were all greased up by the time of the party, and we had to put new ones on at the last minute! As Jimmy Fallon's teenage girl alter ego would say, it was so Ew!

Click here for free Yo Gabba Gabba cupcake topper printables. PS... we did square so they are easier to cut out with a paper cutter! Oh the efficiency!!!

Bruce's Very Hungry Caterpillar First Birthday Party

Recently our littlest boy turned one! We did a Very Hungry Caterpillar inspired birthday for him, and it was the cutest party I have ever done! I loved this book when I was little, and I have been itching to do this party for years! My first son had a Car birthday party for his first, and I saw some invites for a VHC party AFTER... so I had to wait 3 more years to throw this cute-fest!


With some internet searching, I quickly realized how expensive official VHC party supplies were (they are no longer offered at Target, where I originally saw them). So we had to make our own, and it was super easy and fun. Luckily, I have a very computer savvy, design-y husband who will make whatever I throw at him, so he was able to scan the book and print images for the party, with whatever wording I wanted. He also made our invitations and thank you notes! I'm not really sure how people can charge for designs and printables that use images from copyrighted books... but I'm also no legal expert. Anyways, I want to offer our files so other's can easily print them for free to throw a cute party too, so that is one reason for this post! I will post pictures below of how we did our party, and then you can download the prints if you want!


For our food table, we purchased all of the things the Caterpillar ate in the book, and offered them as the snacks for our party. We stuck the labels on the food trays using the images from the book. It was adorable and I'm slightly obsessed! (I am sorry for the bad lighting, it may have had something to do with the green and red streamers covering all of the natural light)


We used grapes for the blueberries, and you can't see them, but we cut out tiny pie shaped slices from cherry poptarts for the cherry pies.


The table cloth we used was "watercolor polka dots" from Party City. It was perfect for our theme, and way cheaper than official VHC stuff because it was on super sale!! I loved it, and thought it worked really well. You can find it here.

For our signs, which I absolutely loved (even the imperfect-ness of them, because that is so like Eric Carle), I bought some Freezer Paper and set out to make them at about 1am the night before... I mean the week before, because I'm that organized and on top of things. I bought a pack of cheap sponges, and cut circles out of them, then sponge painted different colored circles on... YES! You read that right... I 1990's sponge painted the night away! Then I just taped on cut out images from the book. I also taped images onto the table cloths. It pained me to throw away the sign you see above... it was just so cute!! But that's what pictures are for, I suppose.

           
The cake table! A category 5 hurricane hit here later that day, but it does look oh so peaceful right here, doesn't it? I just went with green iced cupcakes. And yes, I am painfully aware that the sign and the streamers are not centered.... You read how late I was up sponge painting, right? We also put ice cream in a bowl at cake time, because every caterpillar needs ice cream.


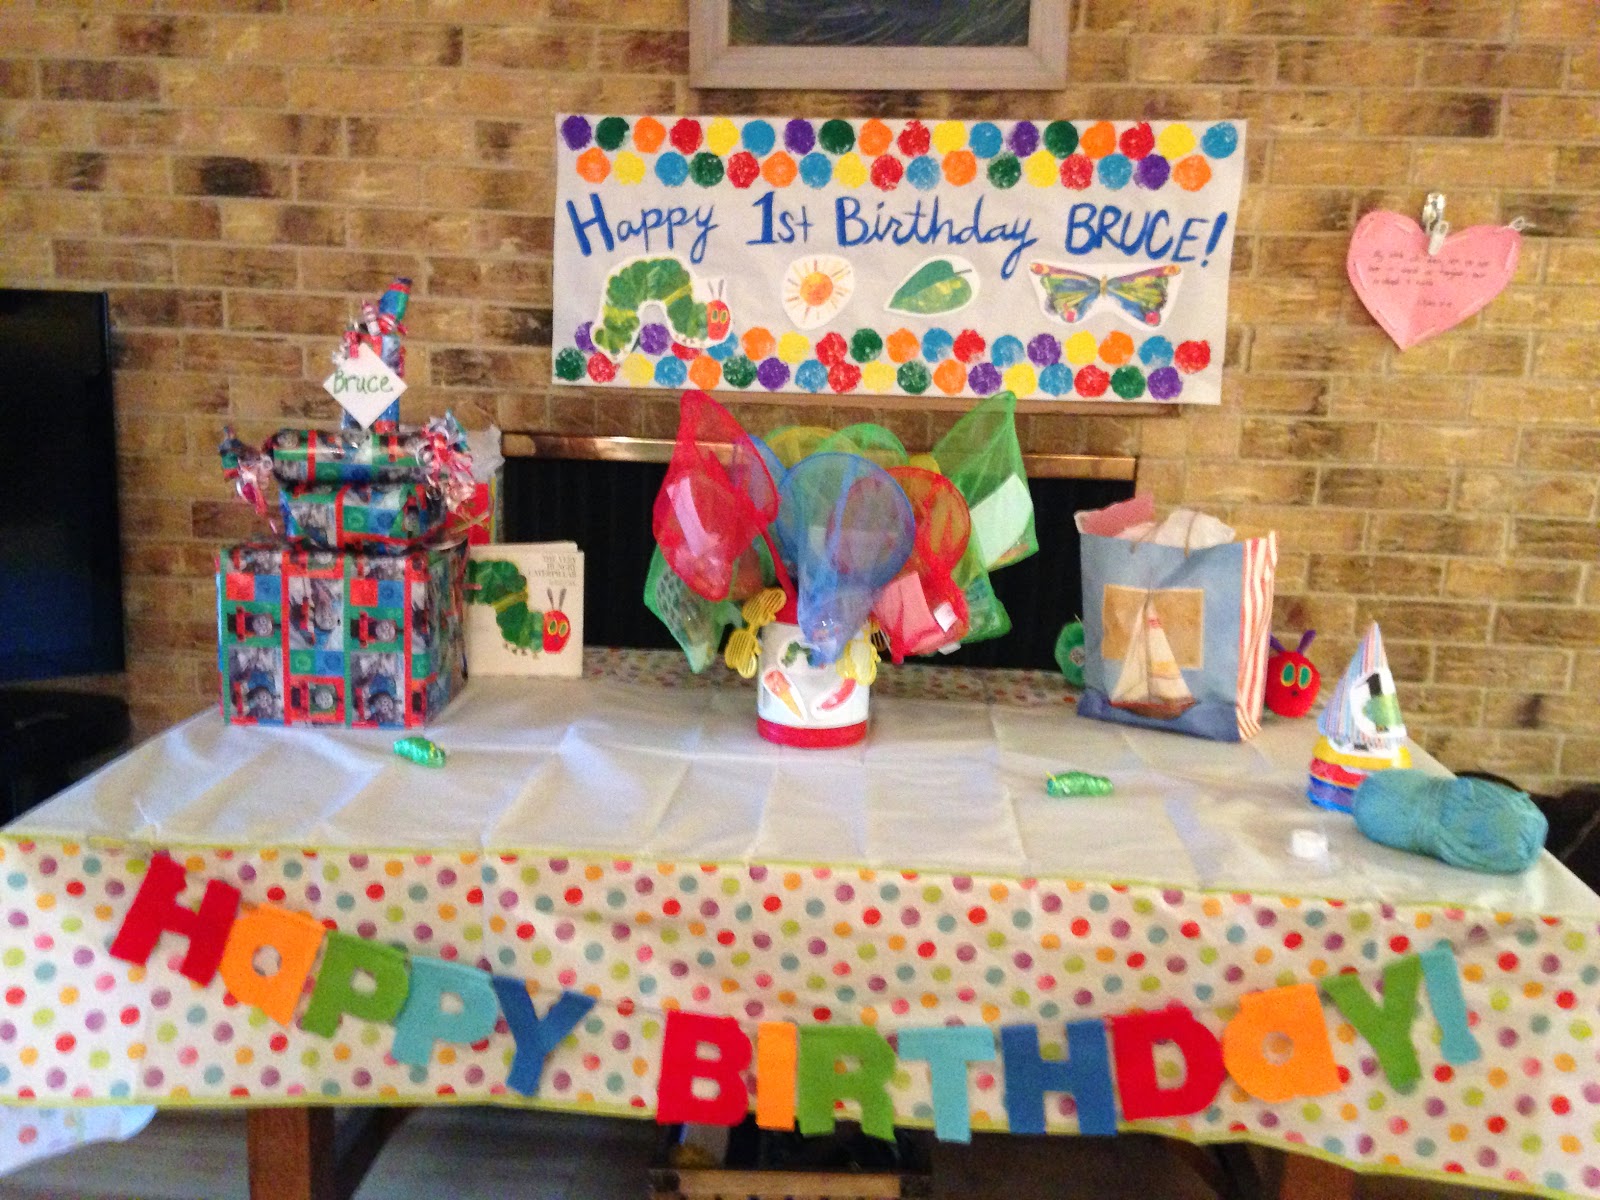
The gift table. The banner is from Target, I got it for a Dolla! Also, for our party favors, we handed out butterfly nets with stickers and sixlets in them. It was a hit, and they were only a dollar at Target. We also printed "thanks for coming to my party" cards with a fat Caterpillar on them. My husband loves the fat Caterpillar. 


One last touch, the party hat! Again, we printed and taped these images to regular party hats, and it was super cute (and Big Brother Approved! BBA for short). Well That was our VHC party, and you can download all of the files we made below, for free. I am not posting our invitations, because I pretty much copied the exact same layout from someone on Etsy, and don't want to get in trouble... but the Thank You's were all my husband's idea (notice the use of the fat Caterpillar). 

For the same font used in the book, click here.
For printable decorations from the book, hat signs, food signs, and thank you cards, click here.